经验分享.

一个简单的过场动画的样式CSS
body:after { content: " "; position: fixed; inset: 0; background-color: white; z-index: 999; background-image: url(https://ttimg.cn/logo1.svg); background-repeat: no-repeat; background-position: center; background-size: 20%; animation: fadeOut 2s; animation-fill-mode: forwards; -webkit-transition: fadeOut 2s; transition: fadeOut 2s; pointer-events: none; background-color: #fff; } @keyframes fadeOut { 50% { opacity: 1; } 100% { opacity: 0; } }

添加好看图形动态背景图
WordPress网站添加一个好看图形动态背景图,样式非常好看,使用简单,CSS代码即可解决的背景美化 代码: body { background-image: url("图片地址");/**这里改为你自己的图片地址**/ background-position-x: center; background-position-y: center; background-repeat: no-repeat; background-attachment: fixed; background-size: cover; } 图片下载地址:https://www.123pan.com/s/fMn5Vv-s6Nod?提取码:wOwe

WordPress添加我的设备页面
演示图 这是我参考张洪大佬的博客里的我的设备(https://blog.zhheo.com/equipment/)进行二次修改的一个小代码,分享出来给各位做个参考。 Html代码 <div class="equipment-item-content"> <div class="equipment-item-content-item"> <div class="equipment-item-content-item-cover"> <img class="equipment-item-content-item-image" alt="小米" src="https://q.ttimg.cn/pic/2024/04/199fc58e68889c74.jpg"> </div> <div class="equipment-item-content-item-info"> <div class="equipment-item-content-item-name"> 小米12S Pro </div> <div class="equipment-i…

WordPress博客添加说说功能和页面
1、首先在主题目录的functions.php里面加入以下代码: //微语 add_action('init', 'my_custom_init'); function my_custom_init() { $labels = array( 'name' => '微语', 'singular_name' => 'singularname', 'add_new' => '发表微语', 'add_new_item' => '发表微语', 'edit_item' => '编辑微语', 'new_item' => '新微语', 'view_item' => '查看微语', 'search_items' => '搜索微语', 'not_found' => '暂无微语', 'not_found_in_trash' => '没有已遗弃的微语', 'parent_item_colon' => '', 'menu_name' => '微语' ); $args = array( 'labels' => $labels, 'public' => true, 'publicly_queryable' => t…

给你的网站添加一个滚动Banner
最近挺多人找我要首页的滚动banner教程,所以今天把代码整理了一下放博客里,需要的自取!! 声明一下,这个是张洪heo的原创,被我扒了过来,前段时间发布过一版!! 演示图: HTML代码: <link rel="stylesheet" href="/*CSS文件路径*/"> <div id="home_top"> <style type="text/css"> .todayCard-title, .todayCard-tips, .topGroup.banner-button { color: #ffffff } .topGroup.todayCard { background: #000000 } </style> <div class="recent-top-post-group" id="recent-top-post-group"> <div class="recent-post-top" id="recent-post-top"> <div id="bannerGroup"> <div…

快速生成微信公众号二维码的官方接口
在运营微信公众号的过程中,我们经常需要分享公众号的二维码,以方便用户进行关注。微信官方提供了一个非常便捷的二维码外链接接口,可以帮助我们快速生成公众号二维码,下面我将详细介绍如何使用这个接口。 微信公众号官方提供了一个二维码生成接口,通过该接口,可以生成一个特定公众号的二维码,供用户扫码关注。这个接口生成的二维码具有唯一性和官方性,安全可靠。 接口地址 二维码接口的使用方法: 要生成公众号的二维码,可以将其原始ID替换到接口地址中的username参数 https://open.weixin.qq.com/qr/code?username=原始ID 使用外链图片 可以直接使用外链的二维码图片,将生成的二维码链接嵌入到HTML页面中。使用img标签插入图片非常方便。以下是一个简单的示例: <img src="https://open.weixin.qq.com/qr/code?username=原始ID" alt="公众号二维码" />

给你的博客添加一个热力图插件吧
标题所示插件的具体效果应该通过首页可以看到了,用法很简单。如果是不想修改直接拿来用的话,直接解压缩,然后放到usr/plugins/的CalendarGraph目录下 直接使用的话: 在需要显示的位置:<?php \Typecho\Plugin::factory('index.php')->renderGraph() ;?> <?php \Typecho\Plugin::factory('index.php')->renderCalendar() ;?> 但在实际应用中,我的这个插件样式肯定不可能和你们现有的模版皮肤相配套,所以其实你们可以参考我的这两个函数的写法,直接在模板里面写上 <style> #tooltip {zindex: 999;display: none;position: fixed;left: 0;top: 0;height: 25px;background-color: rgba(0, 0, 0, .8);color: #fff;padding: 4px 10px;border-radius: 3px;font-si…
实现小程序全局防截屏和录屏
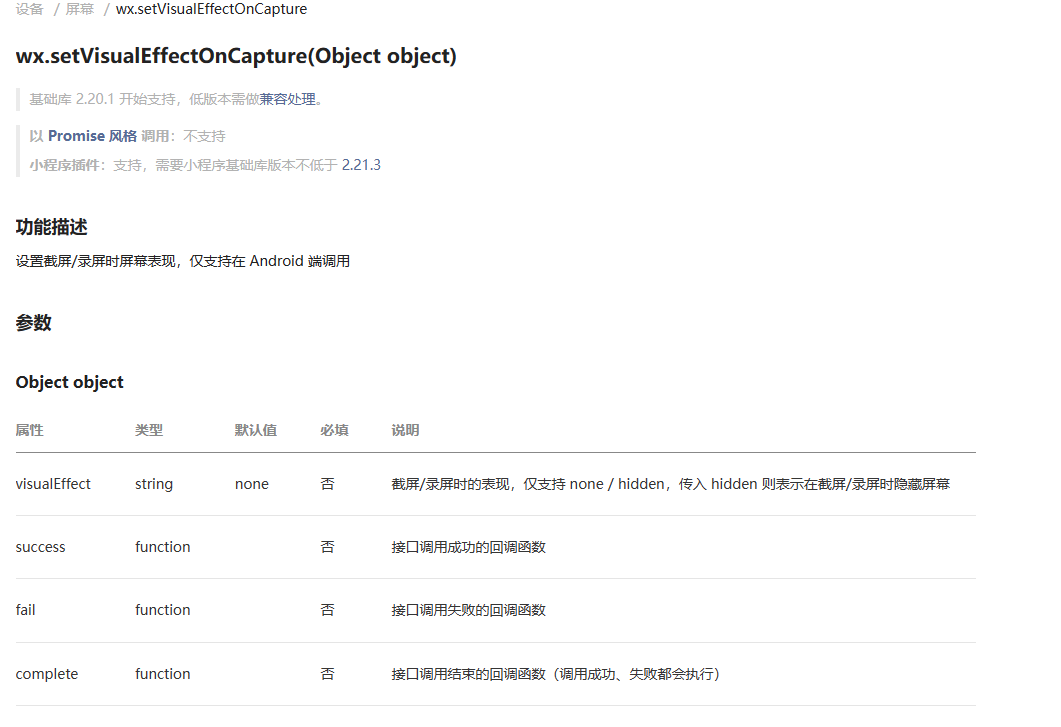
前言:可能有些朋友会用到这个功能,目前测试在安卓有效,iOS可以截屏但是无法录屏。代码是由小天提供的。代码:wx.setVisualEffectOnCapture({ visualEffect: 'hidden', success: (res) => { console.log(res) }, fail: (err) => { console.log(err) }, complete: (res) => { console.log(res) } }) wx.onUserCaptureScreen(function (res) { console.log('用户截屏了') })使用方法:放到app.js里的onLoad: function () 后面
手机端网站首页开屏启动图代码的两种方式
手机端网站首页开屏启动图代码的两种方式,检测到是手机端打开网站就会像APP一样弹出启动图,并且右上角有跳过按钮。看到 QQ 群里有人想要这个代码,那就果断分享出来吧!<div class="cpm-box"> <a class="cpm" href="链接"> <div class="preview pop" style="/* visibility: hidden; */"> <img src="头像"> <span class="txt-item" style="top:calc(15% + 150px)">标题</span> <span class="txt-item" style="top:calc(15% + 190px)">描述</span> </div> </a> <div class="cpm-time"><span></span> 立即跳过</div> </div>/*首页启动图*/ .cp…
微信小程序之内嵌网页(webview)
微信小程序提供了新的开放能力!它终于开放了在小程序中内嵌HTML页面的功能!从微信小程序基础库1.6.4开始,我们就可以在小程序内放置一个组件来链接我们的HTML页面了。在这之前,我们在小程序中没有办法整合我们已有的HTML程序(比如HTML5文章系统,商城系统等),只能使用小程序的方式重新开发一套,现在有了就可以方便的集成这些网页系统,为我们减少了可观的工作量。下面我们来看一下具体如何使用。设置权限要在小程序中访问外部网页,需要先设置允许访问的业务网站的域名。让我们先登录小程序平台管理后台页面,进入“设置” => "开发设置",可以看到这边多出来了一块“业务域名”的设置区域:点击“开始配置”按钮,弹出一个窗口,我们可以在这个窗口中添加一个或多个你要在小程序中访问的域名。当然,不是所有的域名下的网页你的小程序都可以访问,只有那些你可以“掌控”的网站,你才可以访问!你需要在这个窗口里下载“校验文件”,并把这个校验文件上传到你的网站的根目录,供小程序平台进行验证,验证通过了才能成功添加域名。示例:<web-view src="https://你的网址" />


最新评论

“Liquid Glass”效果的实现思路很有参考价值,尤其适合用在导航栏、卡片等需要层次感的组件上。期待补充一下在不同背景和滚动状态下的性能表现与适配细节。
Simon Johansen /

看完最大的感受是,先把一个小场景跑通,比一上来堆一堆 Skills 靠谱。我上周就拿“报销单整理”当试验田,只做一件事:把手机里拍的票据变成能打印的东西,跑顺了再往里加步骤,比贪多省心不少。
那几天我用 LensUp 把一叠发票照片转成 PDF,顺手把身份证正反面拼在一页 A4 上交表格,省了跑一趟打印店。压缩是按你选的目标大小尽量贴近,偶尔会稍稍超一点,真要过门户审核前自己再看一眼比较稳妥。
LensUp PDF Tools /

把大赛勋章的固件重写成随身网络音乐盒,这个改造思路很有意思,尤其是把原本偏纪念性质的硬件重新赋予实际用途。期待看到更多关于网络播放和供电部分的实现细节。
Laura Tanaka /

你好,我是倦意,在做一个小项目:博客汇(https://bkh.jyblog.com),一个通过 RSS 汇集独立博客文章的聚合站。
我读了你的博客,觉得内容很好,已经先把你的博客收录进来了,展示页面在这里:https://bkh.jyblog.com/members/132。
网站只展示标题和摘要,读者点击会直接跳转到你的原博客。如果你不希望被收录,或者想调整展示的博客名称、头像等信息,可以进行博客认领自行修改,或者随时告诉我,我会立刻处理。
冒昧打扰,希望没有给你造成困扰。也欢迎你看看网站,提提建议
倦意 /

我买了一个Photomator Pro,买的时候还是溢价独立的公司,之后没多久就被苹果收购了。现在属于苹果官方出品。
Vind /
最近发布